DIY Loudspeakers
There are no affiliate links on this page. The links are all just links.
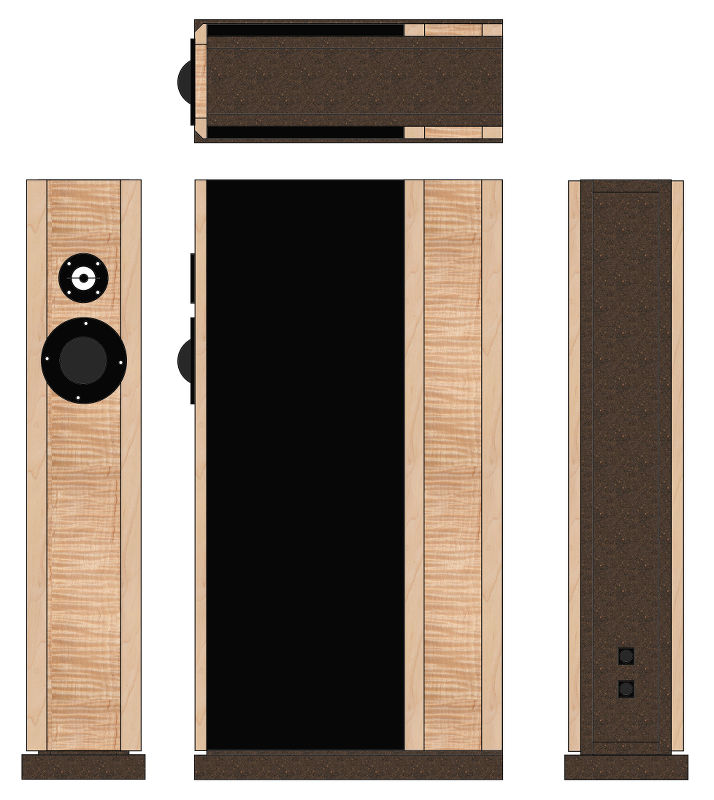
Each speaker has dual 8-inch woofers operating below 500Hz and an all-dome middle and top end. They are 361/2" tall, 19" deep, and only 71/2" wide. They are driven by four 50 watt stereo amplifiers and one 120 watt amplifier (for the subwoofer), with each driver getting its own amplifier. You can see the details of these on the DIY HiFi page.
Final Design
This is the third iteration of the speakers, the first being panels with 6 woofers each, the second boxes with two woofers each, and this one with two woofers and meeting the following criteria:
- They had to fit in an 8" wide space.
- They had to use my existing drivers (8", 2", and 1").
- They had to be attractive-ish.
You can get an 8" woofer in a pretty small box, but the only way to fit an 8" woofer in a 71/2" wide space is to turn it sideways. That pretty much defines the whole system topology. These woofers don't work well in a 2-way system - in fact they came from a 4-way system. The drivers need 17.35 liters each, and the enclosure gives them that, yielding a 63Hz f3 with a Q of 0.707.
I was able to put a subwoofer near the center of one wall, between the speakers. A 10" DVC sub running with a 120W amp and velocity feedback which handles the frequencies from 10Hz to 85Hz.
The two 8" drivers take over at 85Hz and go up to 500Hz. One woofer points left and one points right. One is in the top chamber and one in the bottom chamber. The 8" drivers were $10 each from a surplus place, Apex Jr. The woofers are omni-directional in the cabinet up to about 560Hz, where the driver size begins to limit the dispersion.
The midrange goes from 500Hz to 5kHz. It is a Dayton 2" aluminum dome driver, and exhibits the metal dome peak at around 12kHz, well beyond the crossover point. It was chosen because it can reach down to 400Hz, and I could cross between the woofers and midrange at 500Hz, before the woofers started beaming. They were $42.00 each from Parts Express.
The Tang Band 1" ceramic dome tweeter goes up from 5kHz, and has a similar peak at just over 30kHz, well beyond the range of these old ears. It is actually a ceramic coated aluminum dome. Sounds great. It was chosen for its flat response from 5kHz up, and for lower distortion. The scuttlebutt is that they sound harsh if crossed at 3.5kHz. I can see where that might be true. 5kHz is perfect for them. $35.00 each from Parts Express.
The wood was under $100, the Speakons were $4.50 each (x8) so around $290.00 for the boxes and drivers. Add $100.00 for the speaker cables, $160.00 for a pair of MiniDSPs, and you get $550.00 plus amplifiers. I originally used a pair of 4x100W Class-T amps ($200.00 total with power supplies), but they sucked so bad that I had to replace them with a bunch of LM3886 amplifiers. The HiFi Saga explains that process in some detail.

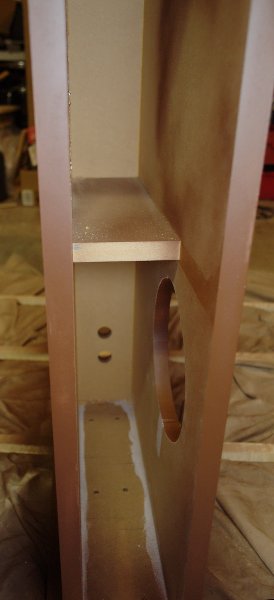
This drawing is of the MDF core of the enclosures with the front panel and one side off. The center drawing is a section showing the rear, top, bottom, and the center divider. The cutout for one woofer may be seen on the side panel.
The MDF parts are:
- 4 ea. 18" x 35" panels for the sides
- 4 ea. 71/2" x 19" panels doubled up for the bases
- Everything else
"Everything else" is 4" wide by however long. With all of the parts being the same width, it doesn't matter if it was cut perfectly to size. The 4" parts are all cut with the same setup on the table saw. They have to fit. If you need to change the internal volume of the enclosures, this is the easiest dimension to manipulate. Here is the cutlist for the speaker enclosures. The 4" parts are cut 477/8" long because I can't fit 8' in my car and the cutlist software won't allow me to specify "just cut them in half". I did not cut this MDF myself, but had WoodworkersSource cut it for me. The cut charge was around $20, and saved me a ton of time and sawdust to clean.
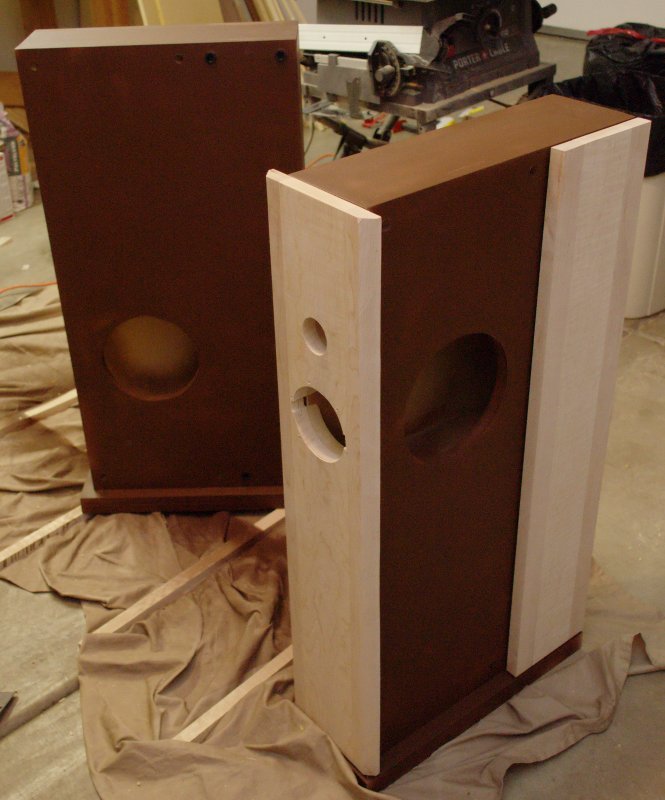
The core is wide enough at 51/2" that the mid and high drivers could just be mounted directly on it, but that would be ugly. Or uglier.
Enclosure Assembly
Assembly is typical of a speaker box, so I'll just hit the high spots. The bases were glued up first, the bottom panel glued and screwed to that, and then assembly as usual from there. I used biscuits. They make it as simple as putting a part in place and clamping it, because once in place it won't move.
The sides, top, bottom and rear panel were all assembled as a unit, leaving the front open. The holes for the woofers were made after the core box was assembled, as were the holes for mounting the grilles and maple panels. The enclosures are mirror images, so they will be symmetrical in the listening room.
The side panels were supposed to just clip on with grille fasteners, which only have give in one direction, and are stiff in the other. The ball on the end likes to break off. I won't be doing that again.
Painting the Texture
I painted the exposed portions of the box with stone paint. Dark brown and black. This stone paint is different. It takes two coats, but the second coat can be applied anytime. The dry time is 24 hours, but it stays slightly sticky for days. It doesn't smell nearly as bad as regular paint, and appears to be lumps of paint suspended in a solvent like mineral spirits, which does not dissolve the lumps, but evaporates leaving them on the surface. Now they have gallon cans that you can use with a roller. That would have been much easier to use.
Baffle Assembly
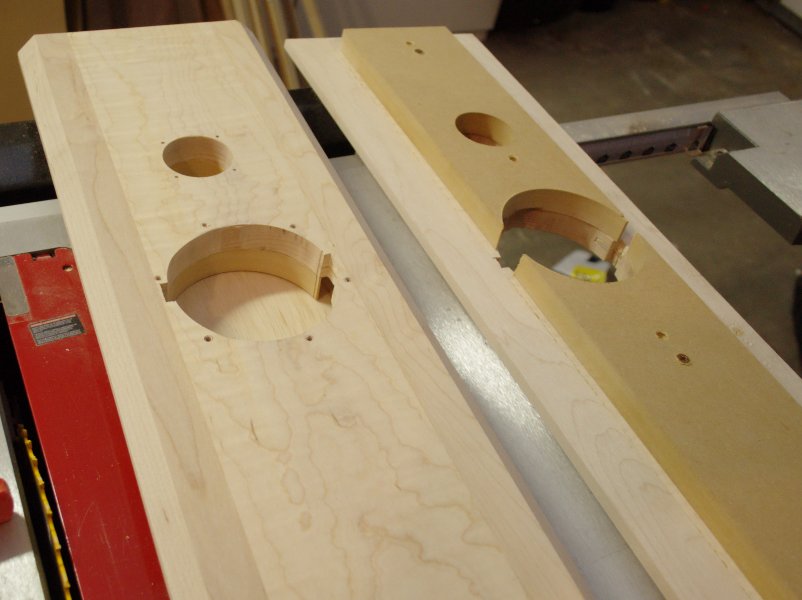
The baffle has two parts - the 4" wide MDF front panel and the hardwood baffle. The front panel is screwed to the baffle from the MDF side. The front panel is positioned so it is centered on the width, but 13/16" or so from the top of the baffle. This allowed for the thickness of the top panel and the thickness of the paint. I used glue and 1" screws, pre-drilling the holes, making sure not to put a screw where the midrange or tweeter would be.
The midrange hole is 4" in diameter. The inner baffle is also 4" wide. You can see the problem in the picture. A note: Don't use a 4" Forstner bit to cut a speaker hole - use a router. It turns the entire contents of the MDF hole into thin curly shavings that cover the floor to a 1 foot depth and turn into dust when you try to collect them.
The midrange and tweeter both have sealed rear chambers, so no separate internal space was required.
The proportions of the box necessitated extra stuffing, and getting the amount right involved pulling four woofers, stuffing four chambers, putting the woofers back in, and testing. Ultimately I think I got it right. They sound amazing. They don't sound compressed or held back in any way. Imaging is good. I'm very happy with them.
The only photo I have of them is on the Homebuilt HiFi article. The picture shows one speaker on the left of the amplifier stack.
I have most of the parts to build another pair. What would I do differently?
- No two-tone panels. There were too many cuts and glue-ups involved in the 6 panels (56 total cuts).
- Woofer grilles narrower and starting farther back so part of the enclosure is visible. The baffle would then be only 5-1/2" wide, a lot like these Brodmann speakers.
- Baffle only 1/4" to 3/8" thick. It doesn't do anything but look good, and thin is a lot easier to cut holes in.
- Different wood. Shedua or maybe Sapele dyed a "red mahogany", or possibly Black Limba.
- Black undercoat instead of brown.
- Three feet made from 1" birch dowel rod that poke out the bottom 1/8" or so.
- Solid MDF grilles. The thin plywood was too hard to work with.