Raspberry Pi 4B Telescope Control using StellarMate OS
I still use the Raspberry Pi 4B primarily as an Indi server, but I have also used Kstars/Ekos on it to polar align and to align the 12" ACF's secondary. StellarMate has built-in web VNC client, which makes accessing the UI easy for a headless installation. I can load a browser on a Macbook Pro and connect to the server to do the alignment, or my Linux desktop, to turn on power to everything and start Indi.
The Raspberry Pi is powered by a Power Box 5, as is everything else on the scope.
You can run StellarMate from a microSD card, but I wouldn't, for two reasons:
- They are s-l-o-w.
- They have a short life span.
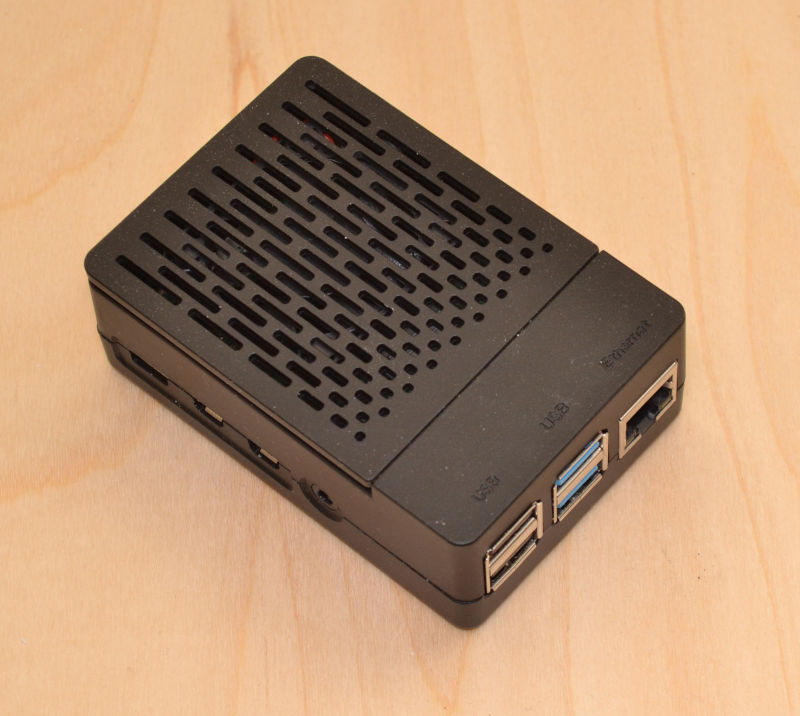
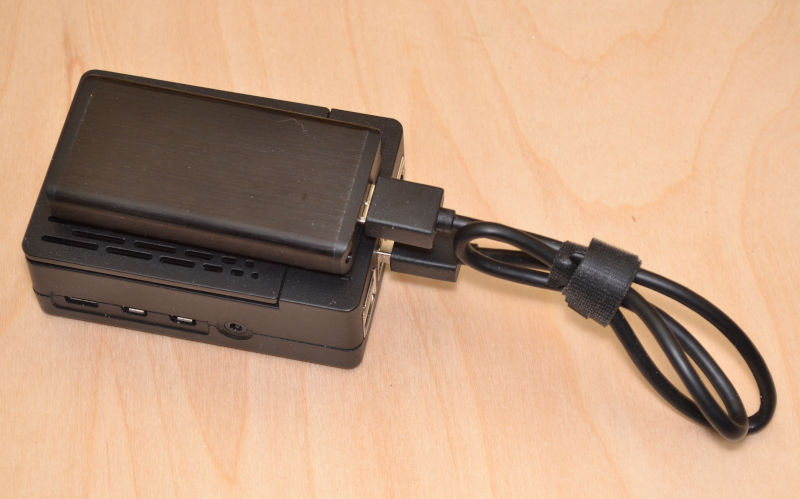
One thing that has changed since my original Indi server project is the update to the boot code on the later Raspberry Pi, which the early Pi 4B didn't have. It allows the Raspberry Pi to boot from an external USB drive. That makes it as simple as plugging in the drive and powering up. There still is some prep work required, but it is much easier. Make sure you use a small SSD - not a 2.5" one. The Raspberry Pi can't really handle a spinner or even a big 2.5" SSD well. It often causes the 5V line to drop below the threshold, causing an alert on the screen. The little mSATA drives I use are ideal. The more capacity - the more power required, so I went with smallish 64GB drives. The working system, in my case, uses 13.9GB, which is probably more on the high side of average.
After buying StellarMate, you download the StellarMate disk image file to your PC, where you have plugged in your USB SSD drive. Normally you would use Balena Etcher to burn the image to a microSD, but you instead burn it to the USB drive. After the burn is complete, you unmount the USB drive, remove it from your PC and plug it into the Raspberry Pi. I use an ethernet cable to connect to the network. Power up your Raspberry Pi, and you're running StellarMate. Now, in a browser, you can go to:
http://stellarmate.local/
You should see a page called "Dashboard". On the left, click the 3rd menu icon from the top, which looks like 9 little boxes, and you will see the "Software" page. You should see "KStars" and "PHD2" with checkboxes beside them. If you don't want them to load on every boot, uncheck them. At the bottom of the left menu is an eye representing "NoVNC". Click on that. You will be logged into StellarMate on the Pi. Go to "System Tools" on the "Applications" menu (upper left). Then click on the "Terminal emulator" item, which opens a terminal window. You need to run the following command in that Raspberry Pi terminal window:
sudo raspi-config
This loads the Raspberry Pi's configuration utility, which you are going to use to expand the filesystem to occupy the entire USB drive. Go to "Advanced Options", then find and hit enter on "Expand Filesystem". Follow the prompts. After it is done, reboot and your entire USB drive is available for use by StellarMate.
One advantage to StellarMate OS over doing it manually is that you don't have to run commands to install everything - it's all there. Kstars, Ekos and Indi, Phd2, plus NoVNC and the Dashboard pages. Use the Dashboard to view memory, disk, network and CPU utilization. The top reasons for my purchase of StellarMate are that the code is the latest stable release and the support is unbelievable. The developers have been known to actually remote into a user's PC and Raspberry Pi to fix a problem. It happened to me. Also, it helps support the maintenance of the whole KStars/Ekos/Indi project.
Other things on the stellarmate.local web page:
- Hardware, which shows the USB devices
- Software, where you can choose to autostart KStars and PHD2 or update
- Network, the place you control things like WiFi hotspot and router connection
- Diagnostics, to backup and restore, reset to defaults, or view logs
- NoVNC, the tool to interact with the Pi's desktop using a browser
I'm running Losmandy Gemini, SBIG CCD, ASI CCD, ASI EFW, Pegasus FocusCube and Pegasus FlatMaster drivers on one rig. I made a little file named 'indi-acf' that runs the server command, so the Pi doesn't need to run KStars and Ekos to serve. The contents of the file:
#------------------------------------
#	indi-acf
#------------------------------------
indiserver -v -p 7624 -m 1024 -r 0 \
indi_sbig_ccd \
indi_asi_ccd \
indi_asi_wheel \
indi_pegasus_focuscube \
indi_pegasus_flatmaster \
indi_lx200gemini
The file needs to have the execute bit set:
chmod +x indi
Now we're ready to run Indi:
./indi-acf
The Indi server loads all the specified drivers, and exposes the server on port 7624. You probably don't need to know that. Ekos knows and uses that port. If you do this, specify only the drivers you need for your rig. Having drivers loaded that don't have corresponding devices can cause problems.
I have a second rig that uses the same drivers, except for the focuser, which is an ASI EAF motor. It is controlled by 'indi-gt81'.
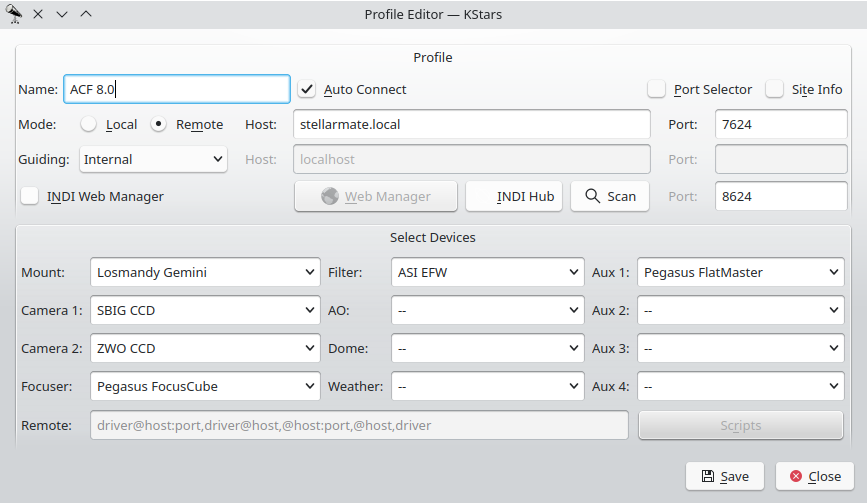
You can then connect to it from a remote PC running Kstars/Ekos by building a profile that contains all the devices you specified above, is set for "Remote" and has the remote host as "stellarmate.local". When you connect, Ekos will attempt to connect to the Indi server and connect the driver to your scope mount, camera, etc.
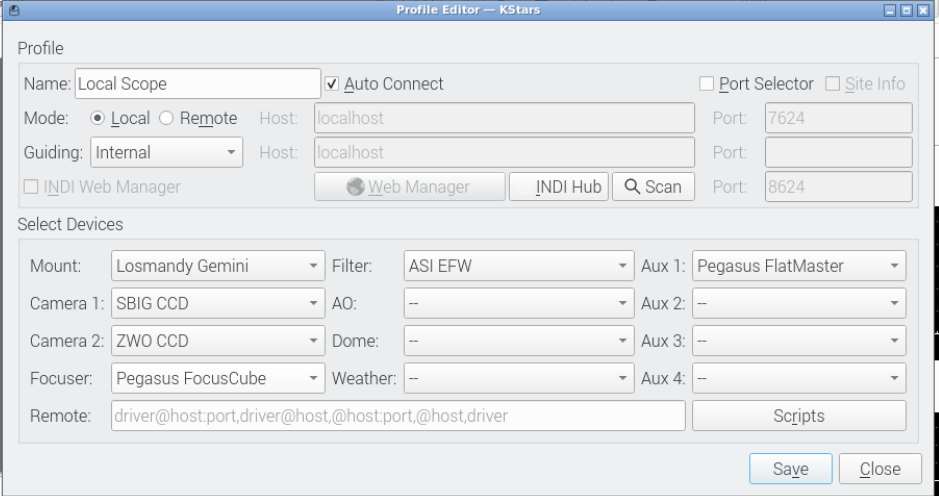
You can also run Kstars/Ekos on the Raspberry Pi, build a profile that contains all the devices you specified above, and is set for "Local". After loading Ekos, select that local profile and click the connect button on Ekos to start Indi and connect to it locally. You can then run Kstars and Ekos on the Raspberry Pi, but I don't recommend it. Performance is not as good as when you run Kstars and Ekos on a PC. I use a Linux PC, but Kstars/Ekos/Indi is available on MacOS as well.
Backups
Being cautious, I have backup systems. I bought 3 identical 64GB mSATA SSD cards, and USB3.0 to mSATA enclosures. The
SSDs came from Amazon and cost $10 each. The USB 3.0 to mSATA enclosures were $14 each.
I configured and used the StellarMate OS with my scopes for a while, and then made two backups when I thought I had settled
on a configuration. To make the backups, I used the dd utility on Linux to make full disk copies, like this:
sudo dd if=/dev/sdf of=/dev/sdg bs=32M status=progress
The command copies from sdf to sdg in 32MB blocks and shows the progress every few seconds or so. WARNING: It is vitally important that
you make sure of the source drive and the destination drive, because dd just doesn't care at all if you get it right or wrong. It will
happily overwrite your root volume with stellarmate if you tell it to. Run fdisk -l first to get the actual drive names:
sudo fdisk -l
fdisk -l will list the drives attached to your system, and shows the USB drives last.
Disk /dev/sdf: 59.63 GiB, 64023257088 bytes, 125045424 sectors
Disk model: ASM1153E
Units: sectors of 1 * 512 = 512 bytes
Sector size (logical/physical): 512 bytes / 512 bytes
I/O size (minimum/optimal): 512 bytes / 33553920 bytes
Disklabel type: dos
Disk identifier: 0xd378bbc2

Device     Boot  Start       End   Sectors  Size Id Type
/dev/sdf1         8192    532479    524288  256M  c W95 FAT32 (LBA)
/dev/sdf2       532480 125045423 124512944 59.4G 83 Linux
You can see that the one drive I have installed is /dev/sdf. If I had another one (an empty one) that I wanted to
copy to, it would show up as /dev/sdg, only because it was installed last. You can see that the optimal I/O size is 32MB.
Note that your drive designations WILL PROBABLY BE DIFFERENT.
With the backup done, you should eject and unplug both the source and destination drives. The drives will be identical, including the disk UUID and Volume names. You can run StellarMate from either drive with exactly the same results. Note that any configuration changes you make on one drive will not magically appear on the other drive. To keep them up-to-date you need to repeat the backup process. Remember that the drives will be indistinguishable by your system. You must plug in the source drive first, get the drive ID (/dev/sdx) and then the destination drive and get the id of that drive (/dev/sdy). Only then should you proceed with the update.
I update the backup drives when I make a significant change and then only after the change has been thoroughly tested.