Computerized Telescope Power Distribution Box v5
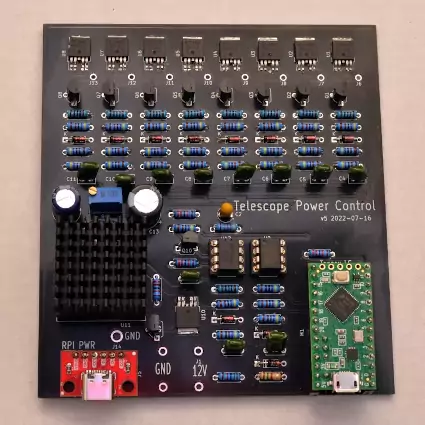
This is the 5th and final installment in the power distribution box saga. It builds on the 4th one, adding a way to monitor the power used by the Raspberry Pi power supply, and power cycle the Pi on demand. With the ability to power cycle the Raspberry Pi, comes the ability to run entirely remote. To force a power cycle, there is a button to press, which sends a command to the power box to cause a power cycle. But the main need to power cycle the raspberry Pi is when I've lost control of the user interface.
Several times I have had to go out to the scope to power cycle the Raspberry Pi because the user interface was hung. Putting a "watchdog" message in the message pump for the Python control app makes it vulnerable to hanging when the UI hangs. If one minute goes by without receiving the watchdog poll, the Teensy LC power controller will power cycle the Raspberry Pi and, by extension, itself.
The secret is the "Enable" line on the DC-DC converter that provides 5V power to the Raspberry Pi. Pulling the line low shuts off the DC-DC converter. Raising it again brings the supply back up, powering up the Raspberry Pi, which powers up the Teensy LC in the power box.
UPDATE: I just found out that the reason some are having trouble finding the Teensy LC is that it is no longer being made. Nor is the Teensy 3.2. A Teensy 4.0 will work, but 2 analog inputs have moved to the bottom side of the PCB. I'm working on instructions on how to make it work, and will update this article when it is ready.
There is a certain amount of cost and complexity around the Raspberry Pi power supply. If one wanted to build this project, but had no need for the Raspberry Pi power supply, all of those components could safely be left off. The rest of the circuit is simple, even though there are a lot of components.
Why a Teensy LC? The number of analog inputs required begs for a Teensy of some kind. The 3.2 and 4.0 boards are not available at this time, due to the "chip shortage" in the world. That leaves the LC, which is less voltage tolerant than the 3.2. This project uses EEPROM, and the Teensy LC doesn't really have any, so an external EEPROM is used. That takes 2 of the analog pins, leaving 10 pins. That is just what is needed to monitor everything that needs monitoring - 8 pins for output current, 1 pin for voltage, and one pin for monitoring the Raspberry Pi current.
There are only 9 digital output pins needed. 8 for the enables on the high-side switches, and one to trigger the power cycle process. More on that below.
Schematic Diagram
The DC-DC converter is a different model than the previous versions. It's still a MeanWell, and still delivers 4A, but it's half the size of the previous ones, and the output voltage is trimmable. There is a high-side switch in the 12V supply to the DC-DC converter, with the enable pin grounded, so it is always on. That way the current to the DC-DC converter can be monitored, and included in the total power calculation. The converter has a nominal input voltage of 24V, but is rated 9V to 36V at full power. It is a bit cheaper than the medical grade converter I was using, at $39.00. Because it has an industry standard pinout and function, there are alternatives available, ranging in price from $7 to $80. I put a heatsink on the converter, because it was getting hot on the breadboard. After I moved it to the PC board, it runs much cooler, so the heatsink probably isn't required. I just have to consider the >40°C ambient temperature in the summer.
To allow the controller to power cycle the Raspberry Pi I had to do some trickery. When the power to the Pi goes away, so does the power to the Teensy LC, so the solution had to bring the power back up with no help from the Pi or the Teensy. To accomplish that, a 555 timer is wired up as a one-shot. A digital signal from the Teensy triggers the one-shot, which drops the enable signal on the DC-DC converter. The Pi shuts off, and takes the Teensy with it. With the Teensy off, the ports all shut off. The 12V supply inside the power box is not affected. For 5 seconds the timer ticks away, then the one-shot resets and enables the DC-DC converter again, bringing up the Raspberry Pi and the Teensy. When the Teensy comes up, all ports will be off except those set to auto start.
PC Board
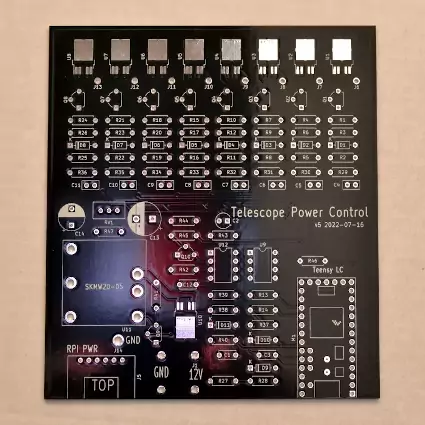
Since early 2017, I've been buying my PC boards from PCBWay. I may need several revisions of a board before I have a keeper, like on this project, so I need inexpensive PC boards, but I need reliability, too. My projects have to survive in some harsh environments here in the desert. PCBWay provides inexpensive and high quality PC board prototypes. Their production is tuned for up to 100mm x 100mm board size, and they can crank them out with consistently high quality for around $5.00 for 10 boards. But I couldn't fit this project series on the standard board size. These boards are 112.52mm x 101.6mm. Since they have 2oz copper, and are larger than 100mm, the cost was $43.88 for 5 boards. Still, it's a bargain compared to the alternatives I've found, and the quality is as high as any I've seen. I compared the price for this board at a few PCB houses, just to see if I was getting a good value. One was $85 for three boards, green only, one was $90.00 for 3 boards, purple only and one was $99.00 for three boards, any color. And 2-3 week turnaround was typical. PCBWay generally turns my boards in 4 days or less, and I get delivery within a week from there. They post the anticipated production time on the website, and you can follow the production of your boards through the factory. If you haven't, you should try them. I find it to be about the same cost as building and hand wiring prototypes, but both easier and more robust. Anyway with this project, I had to use PC boards for the prototype, because of those TO252-5 surface mount parts.
The 12V plane is on the top of the board and the ground plane is on the bottom. It needed to be that way to keep all the components on the top side. I kind of wish I could have found a TO220-5 packaged high-side switch. It would reduce the stress associated with soldering TO252-5 devices. It's not that they're extremely difficult to solder - they aren't, but they're practically impossible to desolder, if I mess one up. A hot-air rework tool would be ideal for working with these devices I suspect. I recently bought one, and tried it out on the backup board. It worked better than a soldering iron, but not perfect. I have some learning to do.
Since this is the end of the project, and I like the way it has turned out, I've built one complete spare board, and another complete except for the DC-DC converter. I used pin sockets on the DC-DC converter this time, so I can easily swap them if needed. If something happens to totally destroy the primary unit, I'll be able to get the scope going again in 15 minutes, by using the backup box until I get the board swapped out.
Trimming the Output Voltage
The SKMW20-05 output is trimmable to ±10%. There are two steps to doing this:
- Start from the desired voltage and calculate the exact resistance.
- Start with a close available resistance and calculate the output voltage.
The first yields an exact resistance, which is rarely available. I used that to get resistance at the 0.25V over voltage I wanted.
15.892 ÷ (Vover × 2.32) - 8.2
15.892 ÷ (0.25 × 2.32) - 8.2 = 19.2kΩ
I dug around in the parts box and found a 20kΩ resistor. To find the output voltage with this resistor:
15.892 ÷ ((R + 8.2) × 2.32) + 5
15.892 ÷ ((20 + 8.2) × 2.32) + 5 = 5.2429V
Close enough, were it not for the fact that the voltage is with no load and no cable. Plan B. Working backwards from the voltage I wanted on the Raspberry Pi header, I adjusted it to 5.25V, and measured the voltage at the output of the DC-DC converter at 5.40V. With no load it was 5.45V. So the output of the converter drops 0.05V under load. But it stays put. Under load the output varies by at most 0.02V, while the voltage at the header on the Raspberry Pi is 0.15V lower, and varies by as much as 0.04V. This indicates to me a cable that has wires too small to carry the current.
So the trick is to use the pot to adjust the voltage on the Pi header to whatever you want, with the cable you are going to use to power the Raspberry Pi, and don't change cables. If you do, you'll probably need to adjust the output of the DC-DC converter again. The choices of resistor and trimpot were arrived at by experimentation. A 1.43kΩ resistor, and a 10k pot give me the ability to adjust the voltage on the Raspberry Pi header from 5.04V to 5.33V under load. Once set, it is pretty steady. I measured the total resistance at 10.7kΩ for 5.25V on the header. The values were significantly different on the breadboard. I think breadboards are not ideal for power supplies.
The Raspberry Pi and the USB 3.0 spec overlap to create a range of 4.7V to 5.25V. As seen in this post, below 4.7V the power management IC gives you a "low voltage" banner, and above 5.25V the USB is out of spec. 5.25V is a reasonable place to be. The locally attached USB peripherals will bring that down some. I have an mSATA external drive attached, so I adjusted the voltage with the drive connected. The other things are this power box, the SBIG camera and the USB hub.
Don't take my difficulty with the voltage to mean there is a problem with these supplies. The voltage range we're dealing with at the header is less than 0.05V as the load varies. It's that the Pi is somewhat finicky when it comes to supply voltage, and the little USB-C cables which are rated for carrying 3 - 5 amps, are vastly overrated, and drop way too much voltage for the Raspberry Pi. The voltage on the power supply varies 0.01V to 0.02V, while the voltage on the header varies 0.03V to 0.04V. So the DC-DC converter is doing its job, but the cable isn't up to it. I do have one cable that is 12" long and works great. I'm using my second best cable for the tests. It is 7" long and has 0.04V drop in the ground wire and 0.1V in the 5V wire. The two I have that work well are very stiff. The ones I have that don't work well are not.
Assembly
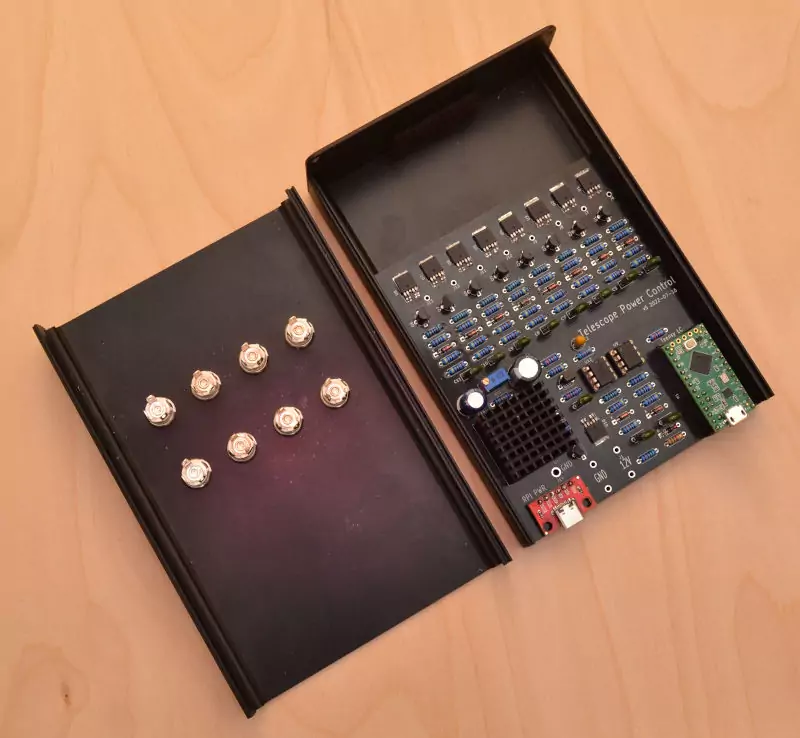
After assembling the PC board, the remaining problems involve getting the current to and from the board. I wound up using 20ga, very flexible, silicone insulated wire with a zillion strands. It's good for 6 times the biggest load I've ever seen on the box. That would be the camera while cooling at 100% power, which draws 1.65A.
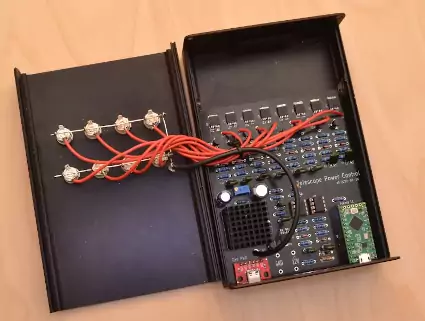
The wiring is just the hot wire to the positive terminal of the jack, times 8. The ground wire is a single 16-gauge wire (silicone, zillion strands) to the ground near the input. The jacks have their grounds tied together with 18ga bus wire. Then there are the 4 wires to the input jack (not shown). Each one can carry 11A, and there are two in parallel, so 22A in a pinch. The power supply only puts out 11.5A, and the scope and peripherals together use less than 5A.
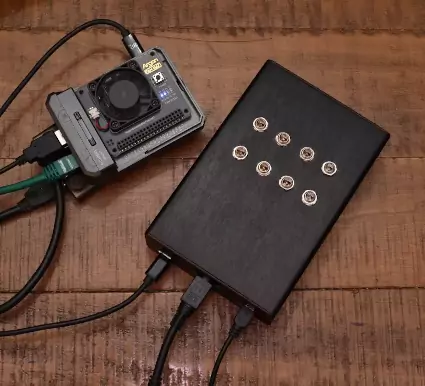
All of the features I wanted are in there, and they work as intended. The hardware didn't give me any grief, it just went together. No kludges on the board, or in the firmware. In over 150 hours of burn-in, it automatically power-cycled once because the Raspberry Pi locked up. I've cycled it many times with either the button, or by hitting CTRL-C in the terminal window that launched the tpc5 app, and waiting a minute for the watchdog to fire. I think it is ready to go on the scope. Now if the weather would cooperate.
Software
There are two pieces to the software - the firmware on the Teensy LC controller, and the Python code running on the Raspberry Pi. First the firmware.
The Teensy code is compiled in the Arduino IDE using the Teensy extension. It consists of a few routines to write digital values, read analog values, and convert those values to accurate representations of the voltage applied and the current drawn by each port and the Raspberry Pi itself. In addition, there is code to power-cycle the Raspberry Pi (and anything connected to the 5V power supply) and also a watchdog timer that will power-cycle the Raspberry Pi if it doesn't receive a watchdog poll for one minute. That feature is only active when the "Start Protection" command is received, and is terminated when the "End Protection" command is received.
I had to modify 'boards.txt' as in this post, in order to get printf to work with floats. It increased the flash memory usage from 53% to 83%, but without it there's no current monitoring.
/******************************************************************************
 *
 * powerctl_teensy.ino
 *
 * This is the program that runs the telescope power control box. It switches
 * power on and/or off for 8 power ports. Current and voltage monitoring, too.
 *
 *****************************************************************************/

#include <Wire.h>
#include "SparkFun_External_EEPROM.h"
#include <InternalTemperature.h>

#define LED 13
#define LED_ON 0
#define LED_OFF 1

// Command message offsets
#define CMD_OFS 0
#define CMD_TYPE 3
#define CMD_PORT 4
#define CMD_VALUE 6

// Command value types.
#define DT_BOOL 1
#define DT_BYTE 2
#define DT_FLOAT 3

// command and response buffer sizes are the same.
#define BUFFER_SIZE 48

// DMP! command timer
#define DMP_TIME_DELAY 5000

// EEPROM stuff 1024 8-byte pages = 8kB
#define EEPROM_SIZE 8192
#define QUEUE_ENTRIES 1024
#define EPR_PAGE_SIZE 8
#define EPR_TIME_DELAY 15000

ExternalEEPROM eeprom;

// CUR? Amperage calc period
#define AMP_TIME_DELAY 2500

#define SENSE_FACTOR 8200
#define V_REF 1.402
#define V_PER_ADU V_REF/4096.0
#define SENSE_A_PER_ADU V_PER_ADU / 1000
#define A_PER_ADU SENSE_A_PER_ADU * SENSE_FACTOR

float ADU2AMPS = A_PER_ADU;

float ADU2VOLTS = (16.61/4096.0);

unsigned long eeprom_tick;
unsigned long amperage_tick;
unsigned long clock_tick;
unsigned long clock_seconds;
unsigned long watchdog_seconds;
bool in_protection;

byte rt_hours = 0;
byte rt_minutes = 0;
byte rt_seconds = 0;

byte state = 0;
byte options = 0;
bool epr_data_dirty = false;

struct Epr_Data {
    uint16_t seq_no;
    uint16_t sig;
    byte options;
    byte spare[3];
};

Epr_Data SETUP_DATA{
        .seq_no = 0,
        .sig = 0x0dca,
        .options = 0,
        .spare = {0, 0, 0},
};

Epr_Data EPR_DATA {
        .seq_no = 0,
        .sig = 0,
        .options = 0,
        .spare = {0, 0, 0},
};

// For clearing the EEPROM.
char ff_16[] = {
        255,255,255,255,255,255,255,255
};

uint32_t last_sequence_no = 0;
uint16_t queue_tail = 0;

int power_pins[] = {0, 1, 2, 3, 4, 5, 6, 7, -1};
int current_pwr_pins[] = {A0, A1, A4, A5, A6, A7, A8, A9, A11};
int voltage_pin = A10;

int power_cycle_pin = 8;

float voltage = 0.0;
float current_pwr[] = {0.0, 0.0, 0.0, 0.0, 0.0, 0.0, 0.0, 0.0, 0.0};
float ah_pwr[] = {0.0, 0.0, 0.0, 0.0, 0.0, 0.0, 0.0, 0.0, 0.0};
float calibration_mult_pwr[] = {
  1.201207243,
  1.254201681,
  1.245826377,
  1.276186404,
  1.153400309,
  1.196872494,
  1.207035989,
  1.300653595,
  1.271876272
};

char port;
bool value_bool;
uint8_t value_byte;
float value_float;

char cmd_buffer[BUFFER_SIZE];
char rsp_buffer[BUFFER_SIZE];
char good_response[] = {"OK\n"};
char version_string[] = {"OK:5.0.3\n"};

/******************************************************************************
 *
 * load_eeprom  Find and load the latest copy of settings in EEPROM.
 *
 *****************************************************************************/

void load_eeprom()
{
    int i;
    Epr_Data ed;
    last_sequence_no = 0;
    queue_tail = 0;

    memcpy(&EPR_DATA, &SETUP_DATA, sizeof(EPR_DATA));

    for (i = 0; i < QUEUE_ENTRIES; i++)
    {
        eeprom.get((i * EPR_PAGE_SIZE), ed);
        if ((ed.seq_no > last_sequence_no) && (ed.seq_no != 0xFFFF))
        {
            queue_tail = i;
            last_sequence_no = ed.seq_no;
        }
    }
    eeprom.get((queue_tail * EPR_PAGE_SIZE), EPR_DATA);
    options = EPR_DATA.options;
}

/******************************************************************************
 *
 * store_eeprom Store the latest copy in EEPROM and increment counter.
 *
 * Writes to a different page each time it writes, incrementing a 32-bit
 * counter.
 *
 *****************************************************************************/

void store_eeprom() {
    queue_tail++;
    if (queue_tail >= QUEUE_ENTRIES)
        queue_tail = 0;
    last_sequence_no++;
    EPR_DATA.seq_no = last_sequence_no;
    EPR_DATA.options = options;
    eeprom.put(queue_tail * EPR_PAGE_SIZE, EPR_DATA);
}

/******************************************************************************
 *
 * erase_eeprom Store ff_32 in block 0, increment counter and repeat to
 * end of EEPROM.
 *
 *****************************************************************************/

char * erase_eeprom() {
    memcpy(&EPR_DATA, &SETUP_DATA, sizeof(EPR_DATA));

    for (int x = 0; x < QUEUE_ENTRIES; ++x) {
        eeprom.put(x * EPR_PAGE_SIZE, ff_16);
    }
    eeprom.put(0, EPR_DATA);
    last_sequence_no = 0;
    strcpy(rsp_buffer, "OK\n");
    return rsp_buffer;
}

/******************************************************************************
 *
 * reset_totals Clears all of the accumulated stats
 *
 *****************************************************************************/

char * reset_totals(void) {
    for (int x = 0; x < 9; ++x) {
        ah_pwr[x] = 0.0;
    }
    rt_hours = 0;
    rt_minutes = 0;
    rt_seconds = 0;
    return good_response;
}

/******************************************************************************
 *
 * setPortPwr   Turns the power on for this port.
 *
 * @param p     The port number (0-7).
 * @param flag  The port should be powered on - True or false.
 * @return      An error message or response.
 *
 *****************************************************************************/

char * setPortPwr(byte p, bool flag) {
    if (flag) {
        state = bitSet(state, p);
    } else {
        state = bitClear(state, p);
    }
    pinMode(power_pins[p], OUTPUT);
    digitalWrite(power_pins[p], flag ? HIGH : LOW);
    return good_response;
}

/******************************************************************************
 *
 * getPortPwr   Returns the status of the port pin.
 *
 * @param p     The port to query.
 * @return      An error message or response.
 *
 *****************************************************************************/

char * getPortPwr(byte p) {
    strcpy(rsp_buffer, "OK:");
    strcat(rsp_buffer, bitRead(state, p) ? "ON\n" : "OFF\n");
    return rsp_buffer;
}

/******************************************************************************
 *
 * setPortAuto  Sets the port to automatically come on at power up.
 *
 * @param p     The port to set.
 * @param flag  The value to set - True or false.
 * @return      An error message or response.
 *
 *****************************************************************************/

char * setPortAuto(byte p, bool flag) {
    if (flag) {
        options = bitSet(options, p);
    } else {
        options = bitClear(options, p);
    }
    epr_data_dirty = true;
    return good_response;
}

/******************************************************************************
 *
 * getPortAuto  Gets the auto start flag for the specified port.
 *
 * @param p     The port to query.
 * @return      An error message or response.
 *
 *****************************************************************************/

char * getPortAuto(byte p) {
    strcpy(rsp_buffer, "OK:");
    strcat(rsp_buffer, bitRead(options, p) ? "ON\n" : "OFF\n");
    return rsp_buffer;
}

/******************************************************************************
 *
 * @param p switched port number
 * @return float amperage
 *
 *****************************************************************************/

float _get_current_pwr(byte p) {
    float amps;
    float adu;
    int pin;

    pin = current_pwr_pins[p];
    adu = analogRead(pin);
    delay(1);
    adu += analogRead(pin);
    delay(1);
    adu += analogRead(pin);
    delay(1);
    adu += analogRead(pin);
    adu *= 0.25;
    amps = adu * ADU2AMPS * calibration_mult_pwr[p];
    if (amps < 0.005) amps = 0.0;
    current_pwr[p] = amps;
    ah_pwr[p] += (amps / 1440.0);
    return amps;
}

/******************************************************************************
 *
 * _get_voltage()       Get the applied voltage (12V or so)
 *
 * @return float voltage
 *
 *****************************************************************************/

 float _get_voltage() {

    voltage = analogRead(voltage_pin);
    delay(2);
    voltage += analogRead(voltage_pin);
    delay(2);
    voltage += analogRead(voltage_pin);
    delay(2);
    voltage += analogRead(voltage_pin);
    voltage = (voltage / 4.0) * ADU2VOLTS;

    return voltage;
}

/******************************************************************************
 *
 * getPwrCurrent    Get the current used by a port.
 *
 * @param p     Port number (0 - 7)
 * @return      good response or error message.
 *
 *
 *****************************************************************************/

char * getPwrCurrent(byte p) {
    float amps;

    if (p > 8) {
        snprintf(rsp_buffer, sizeof(rsp_buffer), "ER:Port %d\n", p);
        return rsp_buffer;
    }
    amps = current_pwr[p];
    if (amps < 0.0) amps = 0.0;
    snprintf(rsp_buffer, sizeof(rsp_buffer), "OK:%4.3f\n", amps);
    return rsp_buffer;
}

/******************************************************************************
 *
 * get
 * rentTotal  API call to get total current
 *
 * @return          float amperage
 *
 *****************************************************************************/

char * getCurrentTotal() {
    float amps = 0.0;
    float tmp;

    for (int x = 0; x < 9; ++x) {
        tmp = current_pwr[x];
        if (tmp < 0.035) tmp = 0.0;
        amps += tmp;
    }
    snprintf(rsp_buffer, sizeof(rsp_buffer), "OK:%4.3f\n", amps);
    return rsp_buffer;
}

char * getAHTotal() {
    float ah = 0.0;

    for (int x = 0; x < 9; ++x) {
        ah += ah_pwr[x];
    }
    snprintf(rsp_buffer, sizeof(rsp_buffer), "OK:%4.2f\n", ah);
    return rsp_buffer;
}

char * getPortAH(byte p) {
    if (p > 8) {
        snprintf(rsp_buffer, sizeof(rsp_buffer), "ER:Port %d\n", p);
        return rsp_buffer;
    }
    snprintf(rsp_buffer, sizeof(rsp_buffer), "OK:%4.2f\n", ah_pwr[p]);
    return rsp_buffer;
}

char * getRunTime() {

    snprintf(rsp_buffer, sizeof(rsp_buffer), "OK:%03u:%02d:%02d\n",
             rt_hours, rt_minutes, rt_seconds);
    return rsp_buffer;
}

char * getADCValues(byte p) {
    int adu;

    adu = analogRead(current_pwr_pins[p]);

    snprintf(rsp_buffer, sizeof(rsp_buffer), "OK:%04x %5d\n", adu, adu);
    return rsp_buffer;
}

/******************************************************************************
 *
 * getVoltageInput  API call to get input voltage (9V-14V)
 *
 * @return          float voltage
 *
 *****************************************************************************/

char * getVoltageInput() {

    snprintf(rsp_buffer, sizeof(rsp_buffer), "OK:%4.2f\n", _get_voltage());
    return rsp_buffer;
}

char * getTemperature() {

    snprintf(rsp_buffer, sizeof(rsp_buffer), "OK:%4.2f\n", InternalTemperature.readTemperatureC());
    return rsp_buffer;
}

char * power_cycle() {
    pinMode(power_cycle_pin, OUTPUT);
    digitalWrite(power_cycle_pin, HIGH);
    delay(5);
    digitalWrite(power_cycle_pin, LOW);
    return good_response;
}

char * start_protection() {
    in_protection = true;
    watchdog_seconds = clock_seconds + 60;
    return good_response;
}

char * end_protection() {
    in_protection = false;
    return good_response;
}

char * watchdog() {
    watchdog_seconds = clock_seconds + 60;
    return good_response;
}

/******************************************************************************
 *
 * getPort      Gets the port number from the host message.
 *
 * @return      True on success, false otherwise.
 *
 *****************************************************************************/

bool getPort() {
    port = cmd_buffer[CMD_PORT] - '0';
    if (port < 0 || port > 8)
        return false;
    return true;
}

/******************************************************************************
 *
 * getPortAndValue  Get the channel number and value from the message.
 *
 * @param d         The type of value to expect. bool, byte, byte.
 * @return          True on success, false otherwise.
 *
 *****************************************************************************/

bool getPortAndValue(int d) {
    // Port is one digit, and value is a bool, byte or float.
    port = cmd_buffer[CMD_PORT] - '0';
    if (port < 0 || port > 8)
        return false;
    int tmp;
    switch (d) {
        case DT_BOOL:
            value_bool = cmd_buffer[CMD_VALUE] & 1;
            break;
        case DT_BYTE:
            tmp = atoi((const char *) &cmd_buffer[CMD_VALUE]);
            if (tmp > 255) {tmp = 255;}
            else if (tmp < 0) {tmp = 0;}
            value_byte = (byte)tmp;
            break;
        case DT_FLOAT:
            value_float = atof((const char *) &cmd_buffer[CMD_VALUE]);
            break;
        default:
            return false;
    }
    return true;
}

/******************************************************************************
 *
 * parseCommand     Takes the command apart and calls the appropriate action.
 *
 * @return          None.
 *
 *****************************************************************************/

void parseCommand() {
    if (!strncmp(cmd_buffer, "PWR", 3)) {
        // Command PWR sets or gets the state to ON (true) or OFF (false).
        if (cmd_buffer[CMD_TYPE] == '#') {
            if (getPortAndValue(DT_BOOL)) {
                Serial.print(setPortPwr(port, value_bool));
            } else {
                Serial.print("ER:port or val\n");
            }
        } else if (cmd_buffer[CMD_TYPE] == '?') {
            if (getPort()) {
                Serial.print(getPortPwr(port));
            } else {
                Serial.print("ER:port\n");
            }
        } else {
            Serial.print("ER:cmd type\n");
        }
    } else if (!strncmp(cmd_buffer, "PWA", 3)) {
        // Command PWA sets or gets the auto on at power up flag.
        if (cmd_buffer[CMD_TYPE] == '#') {
            if (getPortAndValue(DT_BOOL)) {
                Serial.print(setPortAuto(port, value_bool));
            } else {
                Serial.print("ER:port or val\n");
            }
        } else if (cmd_buffer[CMD_TYPE] == '?') {
            if (getPort()) {
                Serial.print(getPortAuto(port));
            } else {
                Serial.print("ER:port\n");
            }
        } else {
            Serial.print("ER:cmd type\n");
        }
    } else if (!strncmp(cmd_buffer, "PAH", 3)) {
        // Command PAH sets or gets the switched port amp hours accumulator.
        if (cmd_buffer[CMD_TYPE] == '#') {
            if (getPortAndValue(DT_FLOAT)) {
                //Serial.print(setPortAH(port, value_float));
            } else {
                Serial.print("ER:port or val\n");
            }
        } else if (cmd_buffer[CMD_TYPE] == '?') {
            if (getPort()) {
                Serial.print(getPortAH(port));
            } else {
                Serial.print("ER:port\n");
            }
        } else {
            Serial.print("ER:cmd type\n");
        }

    } else if (!strncmp(cmd_buffer, "ADC", 3)) {
        // Get the current temperature.
        if (cmd_buffer[CMD_TYPE] == '?') {
            if (getPort()) {
                Serial.print(getADCValues(port));
            } else {
                Serial.print("ER:port\n");
            }
        } else {
            Serial.print("ER:cmd type\n");
        }
    } else if (!strncmp(cmd_buffer, "VER", 3)) {
        // Get the program version number.
        if (cmd_buffer[CMD_TYPE] == '?') {
            Serial.print(version_string);
        } else {
            Serial.print("ER:cmd type\n");
        }
    } else if (!strncmp(cmd_buffer, "CUR", 3)) {
        // Get the total current.
        if (cmd_buffer[CMD_TYPE] == '?') {
            Serial.print(getCurrentTotal());
        } else {
            Serial.print("ER:cmd type\n");
        }
    } else if (!strncmp(cmd_buffer, "AHT", 3)) {
        // Get the AmpHr total.
        if (cmd_buffer[CMD_TYPE] == '?') {
            Serial.print(getAHTotal());
        } else {
            Serial.print("ER:cmd type\n");
        }
    } else if (!strncmp(cmd_buffer, "VIN", 3)) {
        // Get the input voltage.
        if (cmd_buffer[CMD_TYPE] == '?') {
            Serial.print(getVoltageInput());
        } else {
            Serial.print("ER:cmd type\n");
        }
    } else if (!strncmp(cmd_buffer, "TMP", 3)) {
        // Get the cpu temperature.
        if (cmd_buffer[CMD_TYPE] == '?') {
            Serial.print(getTemperature());
        } else {
            Serial.print("ER:cmd type\n");
        }
    } else if (!strncmp(cmd_buffer, "PWC", 3)) {
        // Get the current used by port.
        if (cmd_buffer[CMD_TYPE] == '?') {
            if (getPort()) {
                Serial.print(getPwrCurrent(port));
            } else {
                Serial.print("ER:port\n");
            }
        } else {
            Serial.print("ER:cmd type\n");
        }
    } else if (!strncmp(cmd_buffer, "ERA", 3)) {
        // Erase the EEPROM.
        if (cmd_buffer[CMD_TYPE] == '#') {
            Serial.print(erase_eeprom());
        } else {
            Serial.print("ER:cmd type\n");
        }
    } else if (!strncmp(cmd_buffer, "CLR", 3)) {
        // Reset run timer and all totals.
        if (cmd_buffer[CMD_TYPE] == '#') {
            Serial.print(reset_totals());
        } else {
            Serial.print("ER:cmd type\n");
        }
    } else if (!strncmp(cmd_buffer, "RNT", 3)) {
        // Dump the current run timer.
        if (cmd_buffer[CMD_TYPE] == '?') {
            Serial.print(getRunTime());
        } else {
            Serial.print("ER:cmd type\n");
        }
    } else if (!strncmp(cmd_buffer, "SPR", 3)) {
        // Start the watchdog protection.
        if (cmd_buffer[CMD_TYPE] == '#') {
            Serial.print(start_protection());
        } else {
            Serial.print("ER:cmd type\n");
        }
    } else if (!strncmp(cmd_buffer, "EPR", 3)) {
        // Stop the watchdog protection.
        if (cmd_buffer[CMD_TYPE] == '#') {
            Serial.print(end_protection());
        } else {
            Serial.print("ER:cmd type\n");
        }
    } else if (!strncmp(cmd_buffer, "WDG", 3)) {
        // Watchdog poll.
        if (cmd_buffer[CMD_TYPE] == '#') {
            Serial.print(watchdog());
        } else {
            Serial.print("ER:cmd type\n");
        }
    } else if (!strncmp(cmd_buffer, "PCN", 3)) {
        // Watchdog poll.
        if (cmd_buffer[CMD_TYPE] == '#') {
            Serial.print(power_cycle());
        } else {
            Serial.print("ER:cmd type\n");
        }
    } else {
        Serial.print("ER:unknown cmd\n");
    }
}

/******************************************************************************
 *
 * print_eeprom      Prints the EEPROM block to the Serial port.
 *
 *****************************************************************************/

void print_eeprom(Epr_Data * ptr) {

    Serial.print("SizeOf :  ");
    Serial.println(sizeof(EPR_DATA));
    Serial.print("SeqNo  :  ");
    Serial.println(ptr->seq_no);
    Serial.print("Sig    :  ");
    Serial.println(ptr->sig, 16);
    Serial.print("Opt    :  ");
    Serial.println(ptr->options, 2);
    Serial.println("");
}

/******************************************************************************
 *
 * setup        Setup the hardware and firmware to run.
 *
 *****************************************************************************/

void setup() {

    Serial.begin(230400);
    pinMode(LED, OUTPUT);
    pinMode(power_cycle_pin, OUTPUT);
    digitalWrite(power_cycle_pin, LOW);

    Wire.begin();
    Wire.setClock(400000);
    Wire.setSDA(17);
    Wire.setSCL(16);

    interrupts();
    load_eeprom();

    // Set the starting value of all ports.
    for (byte x = 0; x < 8; ++x) {
        pinMode(power_pins[x], OUTPUT);
        digitalWrite(power_pins[x], LOW);
        if (bitRead(options, x)) {
            digitalWrite(power_pins[x], HIGH);
            state |= bit(x);
        } else {
            state &= ~bit(x);
        }
    }
    analogReference(EXTERNAL);
    analogReadRes(12);
    memset(cmd_buffer, 0, sizeof(cmd_buffer));
    eeprom_tick = millis() + EPR_TIME_DELAY;
    amperage_tick = millis() + AMP_TIME_DELAY;
    clock_tick = millis() + 1000;
    clock_seconds = 0;
    rt_hours = 0;
    rt_minutes = 0;
    rt_seconds = 0;
    in_protection = false;
}

/******************************************************************************
 * loop     Main program loop.
 *
 * Checks for a command every mS, checks if EEPROM needs writing, current
 * needs reading, or the RTC needs updating.
 *
 *****************************************************************************/

void loop() {

    // Did the host request something?
    if (Serial.available()) {
        // Read until linefeed.
        if (Serial.readBytesUntil(10, cmd_buffer, sizeof(cmd_buffer))) {
            parseCommand();
            memset(cmd_buffer, 0, sizeof(cmd_buffer));
        }
    }
    // Is it time to read current?
    if (amperage_tick < millis()) {
        amperage_tick = millis() + AMP_TIME_DELAY;
        for (byte idx = 0; idx < 9; ++idx) {
            current_pwr[idx] = _get_current_pwr(idx);
        }
    }
    // Is it time to flush to EEPROM?
    if (eeprom_tick < millis()) {
        eeprom_tick = millis() + EPR_TIME_DELAY;
        if (epr_data_dirty) {
            store_eeprom();
            epr_data_dirty = false;
        }
    }
    // Is it time to update the RTC?
    if (clock_tick < millis()) {
        clock_tick = millis() + 1000;
        ++clock_seconds;
        if (in_protection && (clock_seconds > watchdog_seconds)) {
            power_cycle();
            end_protection();
        }
        if(++rt_seconds > 59) {
            rt_seconds = 0;
            if (++rt_minutes > 59) {
                rt_minutes = 0;
                ++rt_hours;
            }
        }
    }
}
Firmware Calibration
This time, rather than make a graph of the sense outputs, since the offset seems to be negligible and the BTS433 sense output has proven itself to be very linear, I only measured the performance at 3A. I hooked up a 4Ω resistor, calculated the expected current at the applied voltage, and then compared the displayed current to the expected current to get the multiplier. They were all around 1.25 to 1.375. (expected/displayed = multiplier). While I was fooling around, I measured the current used by the Raspberry Pi, and found it to be less than expected. You're supposed to need a 3A supply, but I can't get the thing to use more than 1.7A, compiling indi using both cores. I repeated the process to get the multiplier. (actual/displayed = multiplier). More calculation was required, since the current displayed is the current used by the converter, and is from the 12V supply. The converter is 90% efficient, and so the power used by the converter minus the loss (10%) = power to the Raspberry Pi. Divide by 5V, and that is the current it should be using. It seems to track, but I'm puzzled by that 1.7A value.
The second part is the Python code that runs on the Raspberry Pi, controlling the ports and monitoring the power consumption. It sends the "Start Protection" command when it comes up, the "End Protection" command when it goes down, and sends a watchdog command every 5 seconds in between. There are 2 tabs on the screen - Switches, and Metrics. The Switches tab has the on-off and auto-on/manual checkboxes for each of the 8 switched ports. The Metrics tab has the lowdown on the current and power being used, as well as the accumulated time in operation, volts, amp hours, and CPU temperature.
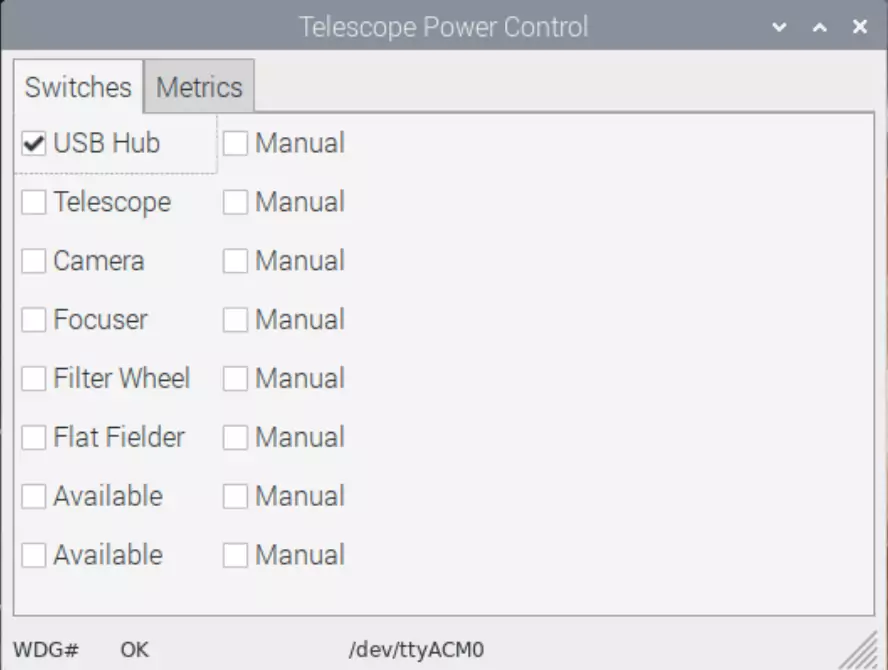
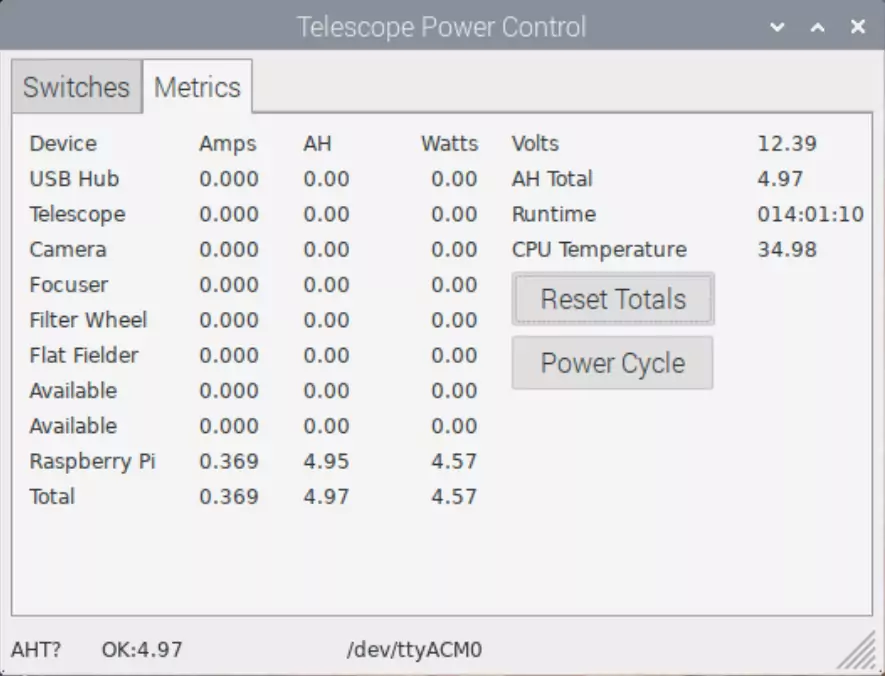
Create a directory "tpc5", and unzip this archive into it. You will need to add pyserial and wxpython. wxpython depends on the wx binaries, so use your package manager to install the latest wx, or get it from the wxWidgets site.
"conf.py" contains the text you see on the switches, and the metrics, as far as which device they are for. You can change them to be anything. All except the last one. It should stay the Raspberry Pi.
Interfacing via USB port
The power box controller expects commands to be issued from the host computer, which in my case is a Raspberry Pi running StellarMate OS. The commands are sent via USB. There is a single command per line, terminated with a line feed. All commands return something - "OK", or "OK:value". Even though there isn't any point in returning a response from the PCN command (because the computer will be gone by the time any response would get sent) it sends an "OK".
The structure of a line is command, command type (#=set/?=get), channel number (0-7), data as required (0=off, 1=on).
All lines end with a linefeed "\n"
Some commands do not have both setters and getters, some commands do not take a channel number, and some do not contain a data field.
The baud rate is ignored, as it runs at USB speed (12Mbps).
| Command | Description | Example |
|---|---|---|
| PWR# | Set a channel on or off. | PWR#7:1 (ch 7 on) or PWR#7:0 (ch 7 off) |
| PWR? | Get a channel on-off state. | PWR?3 or PWR?7 |
| PWA# | Set a channel to auto start on power up. | PWA#5:1 (ch 5 auto on) PWA#5:0 (ch 5 auto off) |
| PWA? | Get a channel's auto start state. | PWA?4 or PWA?0 |
| PAH? | Get a channel's accumulated amp hours. | PAH? |
| PWC? | Get the current being drawn by a channel. | PWC?0 or PWC?7 |
| CUR? | Get the total current being drawn. | CUR? |
| AHT? | Get the total accumulated amp hours. | AHT? |
| RNT? | Get the total run time since last startup. | RNT? |
| CLR# | Reset the runtime and all accumulated data to zero. | CLR# |
| ERA# | Erase all EEPROM data. | ERA# |
| TMP? | Get the CPU temperature. | TMP? |
| SPR# | Start protection. | SPR# |
| EPR# | End protection. | EPR# |
| WDG# | Watchdog poll. | WDG# |
| PCN# | Power cycle now. | PCN# |
Update: 2023-06-09 (Pwr Src) I changed out the single 12V power supply for two 15V power supplies - one for the mount (6A) and one for everything else (8A). It has made a difference in the performance of the mount and the cooler on the camera. The other one was regulated to 12.0V. The 15V supplies put out between 14.7V and 15.0V under load. The mount is rated 18V max and the camera 17V max.
Back to Telescope Power Distribution
This project was sponsored in part by PCBWay.com. There are no affiliate links on this page.
